After a rough week of blogging, work, or just trying to keep up with the kids we could all use a little pampering. You will love this surefire recipe for bath bombs that are so luxurious you will think you just left the spa.

Bath Bombs and Shower Fizzies: Part 1 was originally published on Ruffles and Rain Boots by Sarah Nenni-Daher.
Homemade bath products are amazing and make for well-received gifts. Over the past month, I spent a lot of time testing recipes and now have tons of bath bombs and shower fizzies packaged up and ready for gifting! Join me for a quick list of recipes that molded well, stayed together, and produced an awesome fizz and aroma. If you are looking for some hostess, girlfriend or self-pampering gifts, these are a such a wonderful place to start.
[bctt tweet=”These Luxurious Bath Bombs will make you feel like you just left the #spa! @RufflesAndRain”]
Back to the bath bombs and shower fizzies… Today I’m going to be sharing the most simple mix I’ve tested repeatedly: simple because it uses the least amount of ingredients. Before we get to the recipe, I wanted to mention that I provide detailed instructions for making bath bombs, as well as a plethora of recipes and tips on my Exclusive Content for Email Subscribers page. There is just too much to put into a single post, so I’ve put the majority of the tips there and even additional recipes! If you are new to making bath fizzies, consider making it your starting place. To subscribe, just click here and you will get access to the link.
A few things included in the extras for subscribers:
- What molds should I use? What works, what doesn’t?
- Gloves, spoon, or whisk? Which is best to incorporate the ingredients and color to produce a lump-free, spot-free bath bomb?
- Color: what is the best colorant? How much should be used?
- What do you do when your mix won’t mold? Don’t toss it! Sometimes you can turn that failed recipe into wonderful bath bombs and shower fizzies!
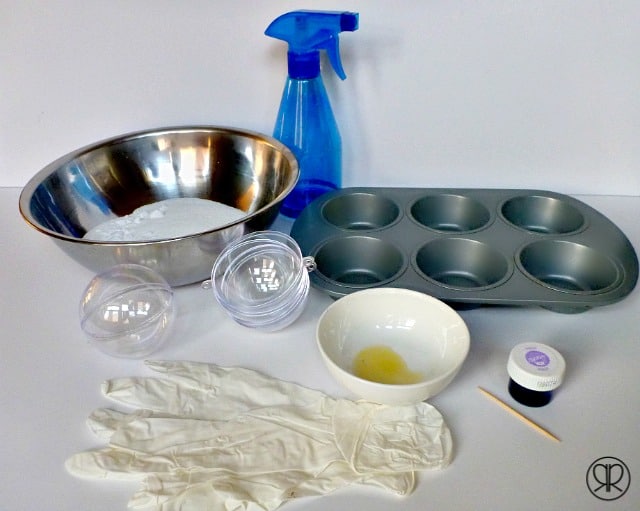
Supplies for Bath Bombs
The supplies for this easy, ‘oil-free’ bath bomb are:
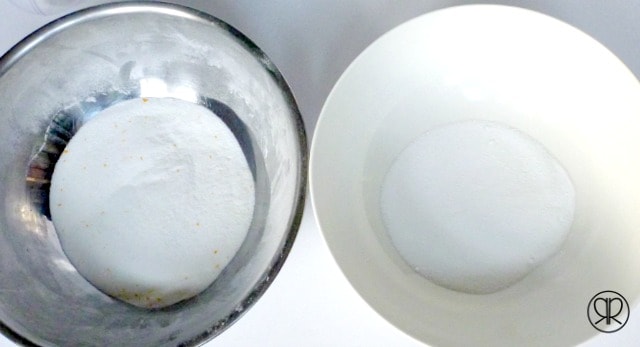
- 1 cup baking soda
- 1/2 cup citric acid
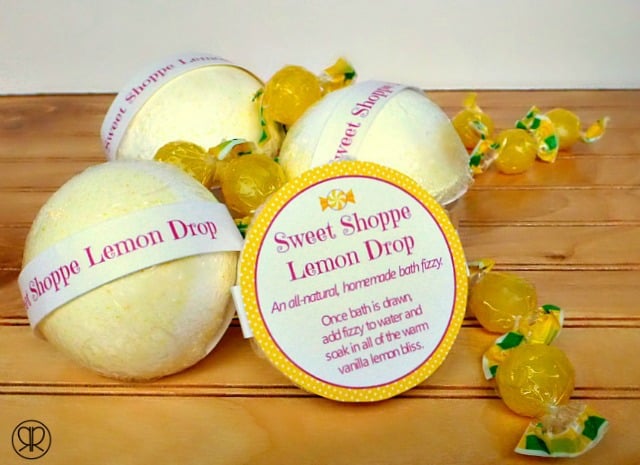
- 15-20 drops essential oil** (can be a combination of oils); for this layered look, I used vanilla and lemon essential oils and only colored half the mix
- a glass (or metal) bowl
- a spray bottle of witch hazel (you’ll only need a very small amount, so phone-a-friend if you don’t have any on hand)
- coloring, optional – I use gel colorants from the craft store (Wilton brand)
Instructions
**Just a quick note on the use of essential oils on children: While some sources (and manufacturers) of essential oils state their use is safe for children under 12, please note that other sources do not, namely Essential Oil Safety, a definitive resource for health care professionals and a highly referenced EO text. An excerpt of this book (and the use of essential oils on children) can be found here, and specifically cites eucalyptus and peppermint (among others) are not to be used on young children. If you want cited studies, click here. We choose not to use eucalyptus and peppermint, among others, with our three year old – I am specifically calling out peppermint and eucalyptus because they are so widely referenced with regards to children.
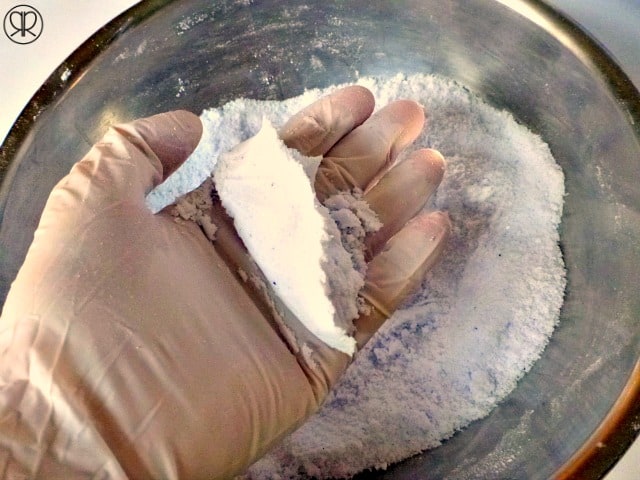
Mix the dry ingredients together (baking soda and citric acid). Mix the essential oil and colorants into the dry ingredients. Add a small amount of coloring (notice I had a toothpick for the gel coloring) – a small amount will go a long way. Yes, that’s purple coloring – you’re so observant – I needed to use my photos from my lavender batch using this recipe because the light was better. Use your hands to incorporate the oils and color very well.
Note: if you want two (or three) colors, separate your mix after adding the oils. Color half and then layer them after they are moistened with the witch hazel.
Use your spray bottle to add the witch hazel to the top of the mix. If you have a large bottle like mine, spray two to three times and then mix it for a solid minute or two before spraying again. If you’re using one of the 3-4 inch spray bottles (travel size), use about 5-8 sprays and then mix. Mix it well, using your gloved hands to get the witch hazel off the sides of the bowl.
When it sticks together without crumbling (photo below) you can begin packing it into your mold. Push it down with your thumb or a tamper, just get it in there tightly. I used the photo from my lavender batch because it was the best shot to show you that the mix is mostly sticking together.
If you are using a full circle mold, stuff the mix in, pack it down, and then add a heaping amount to the top. Squish the two pieces together until the mold is a sphere again, and leave it for about a minute before you remove it from the mold gently. Drape a towel over a muffin tin and place the bath bomb on top of the towel.
If you are using a half circle mold, pack it in and rest it in a muffin tin, flat side up. If you are using a hard silicone mold (not soft), leave it over night before attempting to remove. I like the two colored look using half of the ornament mold, so I layered yellow, then white, and topped with a bit of yellow again.

I put this recipe to the test, just like the other two that I am sharing in this series. I made multiple batches of each, and can safely say that this one works best when left in the molds for a full 24 hours. They aren’t ready for packing at that point – they should be left to dry for at least another 24, but I would suggest 48. This works well for the half ornaments and shapes, but I haven’t tried leaving the full sphere in the mold for more than an hour yet – that’s my next test batch – but read below for more on this.
PROS:
This simple recipe is by far the most fool-proof that I’ve tested. I have made this recipe repeatedly with no errors and have dubbed it the ‘easiest to reproduce consistently.’
Also, this one is great for the majority of us because one doesn’t need a lot of supplies to make bath bombs and shower fizzies that really put out the bubbles and aroma!
CONS:
You will tie up your molds for a day. If you are making a large number of favors, this might not be the best recipe.
Additionally, it takes about 30-45 seconds of constant attention to get them out of the mold (a few massages and taps with the back of the spoon got mine out with absolutely no breakage). I really liked these in the half ornaments and some smaller shapes but haven’t yet tried it with the full sphere because I think it would just result in a study in frustration. Some of the recipes in the exclusive subscriber section (with oils in them) would work better for the full sphere shape, a la the humongous LUSH bath bombs. Go ahead and sign up to get access to those proven recipes!
 Rock Painting Tricks for Kids of All Ages
 A Call to Action: Stop Procrastinating!
 Easy Photo Backdrops to Make Your Blog Photos Pop